|
|
|
|


How To Download and Organize Your Product Files


This 9-step technique is
one of many ways that you can organize your downloaded content from
Daz3D. You will find this most useful if you do not already have
a way of downloading and cataloging your content, or you may want to
watch/read about it to perhaps improve the technique you are currently
using. There are many reasons for considering a way to download
and organize your content purchases, however the biggest two we think
of are:
1) When Daz3D discontinues a product, even though you can still download files from your Product Library, its product page is no longer available.
2) Products that are installed in Daz Studio are sometimes hard to locate in the Content Library, and it comes in handy to have instant access to the ZIP files to find where itis stored in your My Daz 3D Library.
STEP-1: LOCATION
Create a master folder (directory) to contain your 3D Content in the desired location. This is the place where everything will be stored, so be sure it is accessible from anyone who needs to use to it (in accordance with any applicable licensing agreements). We will create ours on our second harddrive (D:), but for most users we highly recommend the use of an external drive because the download and image files can be quite large.
Create a master folder (directory) to contain your 3D Content in the desired location. This is the place where everything will be stored, so be sure it is accessible from anyone who needs to use to it (in accordance with any applicable licensing agreements). We will create ours on our second harddrive (D:), but for most users we highly recommend the use of an external drive because the download and image files can be quite large.

STEP-2: BROWSERS
We will be using two different browsers (Edge and Chrome) to build our local 3D Content library. By doing this the process is simpler and faster, because we can start the file downloads in one browser (Edge) while we capture the web page and images in the other browser (Chrome). Which browsers you use are up to you, but we recommend using a second browser that allows you to drag-n-drop images directly into folders on your system (for this tutorial we will be using Google Chrome).
We will be using two different browsers (Edge and Chrome) to build our local 3D Content library. By doing this the process is simpler and faster, because we can start the file downloads in one browser (Edge) while we capture the web page and images in the other browser (Chrome). Which browsers you use are up to you, but we recommend using a second browser that allows you to drag-n-drop images directly into folders on your system (for this tutorial we will be using Google Chrome).

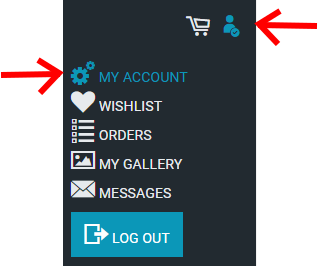
STEP-3: LOGIN
Using your desired browser for the downloads, log in to your Daz Account. Go to My Account and then click on the Product Library button to get to your available products (items you have either purchased or gotten for free from Daz3D).
Using your desired browser for the downloads, log in to your Daz Account. Go to My Account and then click on the Product Library button to get to your available products (items you have either purchased or gotten for free from Daz3D).


STEP-4: DOWNLOADS
Click on the product you will be cataloging in the products list on the left-side of the Product Library page. Now highlight and copy the product name displayed to the right-side of the product page. Right-click on the medium-sized product image and save image or picture as the copied product name in the root of your new 3D content location from Step-1. Scroll down and click on the Download button for the first file listed. Use Save or Save As and browse to your main location where you must first create a new folder for this product (you should still be able to paste the product name as the new folder name). Select this new product folder and save the zip (or other) file using the Save button. Download any remaining files for this product into this same product folder.
Click on the product you will be cataloging in the products list on the left-side of the Product Library page. Now highlight and copy the product name displayed to the right-side of the product page. Right-click on the medium-sized product image and save image or picture as the copied product name in the root of your new 3D content location from Step-1. Scroll down and click on the Download button for the first file listed. Use Save or Save As and browse to your main location where you must first create a new folder for this product (you should still be able to paste the product name as the new folder name). Select this new product folder and save the zip (or other) file using the Save button. Download any remaining files for this product into this same product folder.
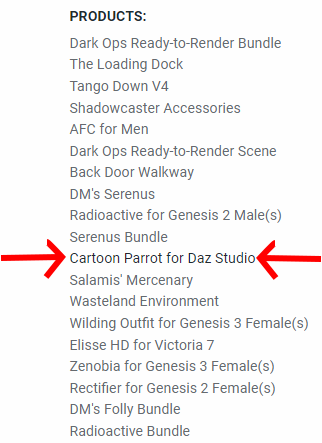
Find Your Product in Listing
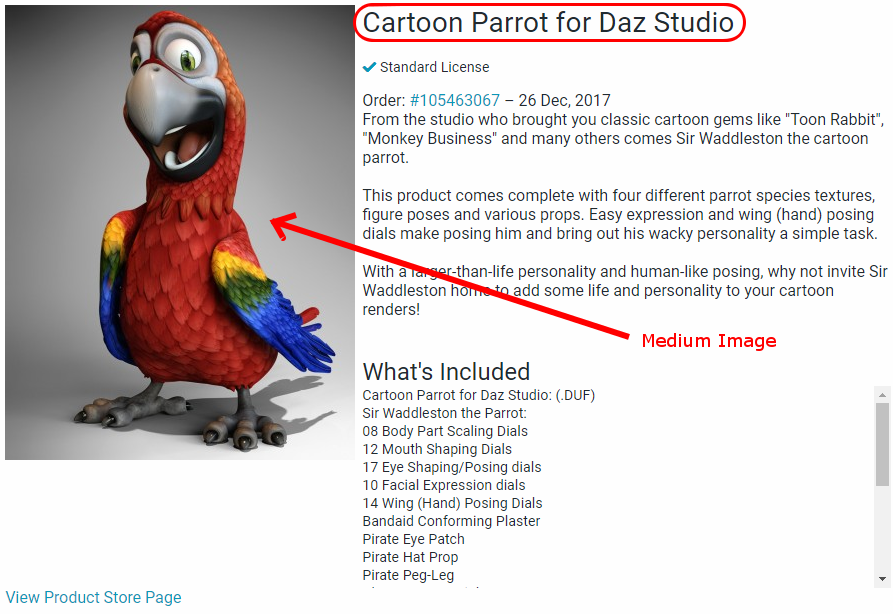
Copy Product Name and Save Medium Image in Master Folder

Download All Files
STEP-5: PDF
You can skip this step, but we highly recommend you at least read this section to understand why it is listed. We often need to recall all of the features that are included with an item that we have purchased (such as included poses or textures). This information is usually available on the main product page for the item, however when a product is discontinued it will no longer have a product page available to view. We have found that the best (and easiest) way to capture this information is to save it as a standard PDF file. If you do not have a PDF printer utility then you can try some of the free ones that are available like PDF995. Copy the View Product Store Page link that is located in the description section of the product to the right-side of the product image. Now open (or create a new tab) in the browser which you will be using to create the PDF. Now use Print or Save as appropriate to save the product page as a PDF in the product's folder. We recommend using something like "ProductPage.pdf", but please use anything that suits your needs and desires.
You can skip this step, but we highly recommend you at least read this section to understand why it is listed. We often need to recall all of the features that are included with an item that we have purchased (such as included poses or textures). This information is usually available on the main product page for the item, however when a product is discontinued it will no longer have a product page available to view. We have found that the best (and easiest) way to capture this information is to save it as a standard PDF file. If you do not have a PDF printer utility then you can try some of the free ones that are available like PDF995. Copy the View Product Store Page link that is located in the description section of the product to the right-side of the product image. Now open (or create a new tab) in the browser which you will be using to create the PDF. Now use Print or Save as appropriate to save the product page as a PDF in the product's folder. We recommend using something like "ProductPage.pdf", but please use anything that suits your needs and desires.

Create ProductPage.pdf
STEP-6: IMAGES
If you skipped Step-5 PDF creation, please open (or create a new tab) in the browser which you will be using to download the product images. Open your operating system's file browser and navigate to the product folder you created in Step-4. In the browser, click on the main product page image to activate the popup window. Drag and drop the first image into the product folder, then click the right-facing arrow on the images popup and repeat for all remaining images. Close the popup when done.
If you skipped Step-5 PDF creation, please open (or create a new tab) in the browser which you will be using to download the product images. Open your operating system's file browser and navigate to the product folder you created in Step-4. In the browser, click on the main product page image to activate the popup window. Drag and drop the first image into the product folder, then click the right-facing arrow on the images popup and repeat for all remaining images. Close the popup when done.
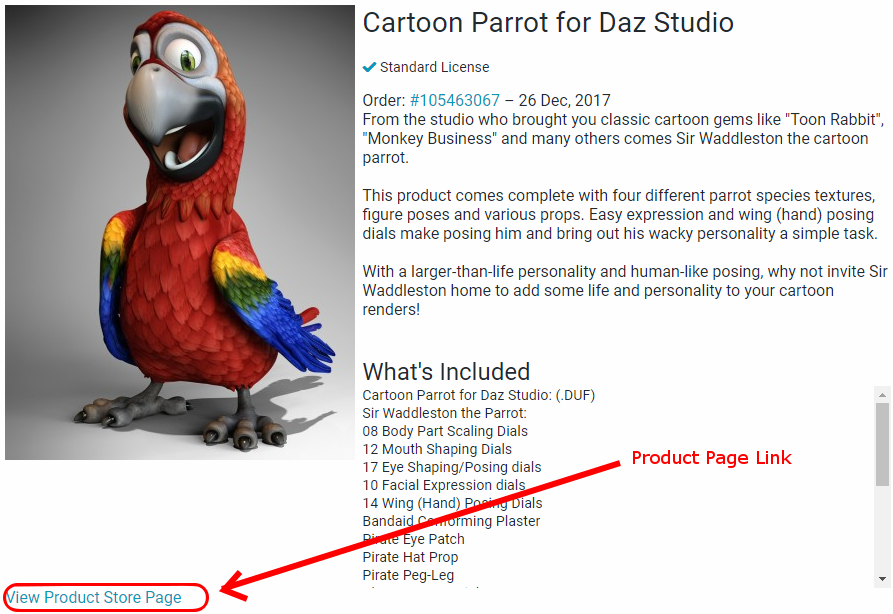
Finding the Product Page Link
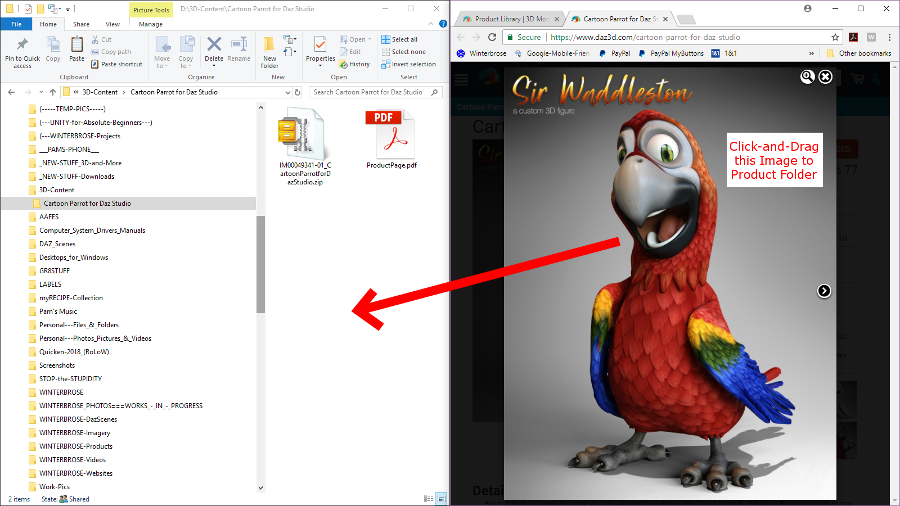
Drag and Drop All Promo Images into Product Folder
STEP-7: SUCCESS
If everything went as planned, you should now have a complete catalog folder for the product which includes all zips, images and description file.
If everything went as planned, you should now have a complete catalog folder for the product which includes all zips, images and description file.

STEP-8 RENAMING
Some people will want to rename the image and zip files, however we have found (after many years of cataloging) that this is not that important to do. You will most likely find that the properly named medium-sized image and product folder for the product you have just competed are more than adequate.
Some people will want to rename the image and zip files, however we have found (after many years of cataloging) that this is not that important to do. You will most likely find that the properly named medium-sized image and product folder for the product you have just competed are more than adequate.

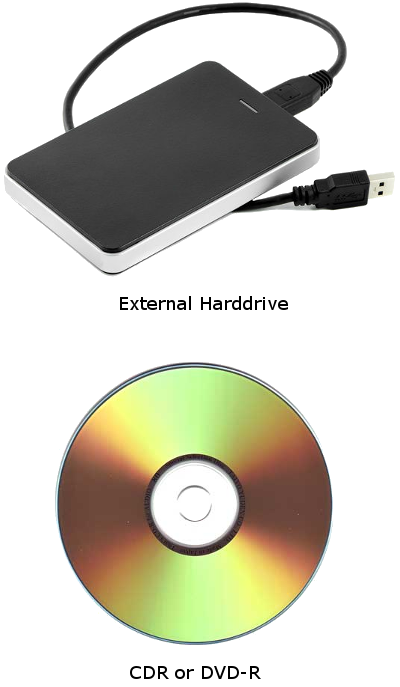
STEP-9: BACKUP
Why bother with any backup media? This is strictly a personal choice, but could come in handy for many reasons. One reason would be that the download harddrive gets corrupted or needs reformatting. Who wants to repeat the whole process again for every product in your account? Not many of us will look forward to that. The speediest way of course is to use another harddrive for the backup folder, but you may also want to consider burning your 3D content to individual CDR or DVD-R for each product or the whole collection. The biggest reason to consider a harddrive over multimedia disks would be because of the occasional updates that are issued for product files.
Why bother with any backup media? This is strictly a personal choice, but could come in handy for many reasons. One reason would be that the download harddrive gets corrupted or needs reformatting. Who wants to repeat the whole process again for every product in your account? Not many of us will look forward to that. The speediest way of course is to use another harddrive for the backup folder, but you may also want to consider burning your 3D content to individual CDR or DVD-R for each product or the whole collection. The biggest reason to consider a harddrive over multimedia disks would be because of the occasional updates that are issued for product files.
We
hope you enjoyed this presentation and can put all or some of the
information to good use. Please visit our homepage to view other
products that may be of interest to you.

Copyright (c) 2017, Winterbrose Arts and Graphics. All Rights Reserved.
http://www.winterbrose.com
